Posts Tagged ‘upgrade’

Nexus: Pre-upgrade check failed. Return code 0x40930062 (free space in the filesystem is below threshold).


16 Jun

While trying to upgrade Nexus 5000 series switch I ran into following issue:

Pre-upgrade check failed. Return code 0x40930062 (free space in the filesystem is below threshold).

Pre-upgrade check failed. Return code 0x40930062 (free space in the filesystem is below threshold).

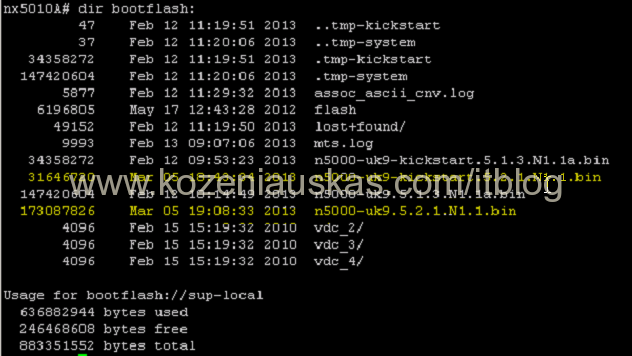
Switch has enough free:
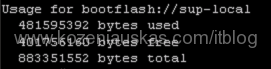
Enough free space

Enough free space

Look at install logs to identify where the problem is by typing:
show system internal log install details | include space

show system internal log install details | include space

show system internal log install details | include space

As you can see the problem is because /var/tmp is bellow the threshold.
To identify what is  taking space in /var/tmp type:
show system internal dir /var/tmp (more…)

Nexus: Upgrading Cisco Nexus 5000


06 Mar

So here is how to upgrade Nexus 5000 series switch. In this instance I have 2 Nexus 5010 switches in vPC configuration as they are part of the Vblock. I will be upgrading them from 5.1(3)N1(1a) to 5.2(1)N1(1)
First of all, although upgrade procedure is pretty much the same, please always check with Cisco for latest upgrade guides:
http://www.cisco.com/en/US/products/ps9670/prod_installation_guides_list.html

For the upgrade to be done as quick as possible it is important to do some work before it, like downloading the files from Cisco, uploading them to switches and running checks.

  1. Download Kickstart and System files from Cisco.com
  2. Verify that you have enough space on the switch
    dir bootflash:
    030613_2025_NexusUpgrad1.png
  3. Upload both files to the switch. In this case I used TFTP server:
    copy tftp://x.x.x.x/kickstart_or_system.bin bootflash:            <=== replace x.x.x.x with TFTP server IP, kickstart_or_system.bin with your Kickstart or System file name.
    type management when asked to Enter vrf
    030613_2025_NexusUpgrad2.png
    Note: In Vblock upload files to both switches. Copy operation might take some time.
  4. Once both Kickstart and System files are uploaded verify that the file size of both files is correct.
    dir bootflash:
    030613_2025_NexusUpgrad3.png
  5. Now we need to run some pre upgrade checks which will show if there any problem that should be fixed before the upgrade can be started
    show compatibility system bootflash:system.bin            <=== replace system.bin with your System file name.
    You should get No incompatible configurations message
    030613_2025_NexusUpgrad4.png
  6. Next we to see the impact of the upgrade:
    show install all impact kickstart kickstart.bin system system.bin        <=== replace kickstart.bin and system.bin with your Kickstart and System file names.
    This procedure might look like a real upgrade but it only does all the checking
    030613_2025_NexusUpgrad5.png
    It will take some time to complete. It must succeed at all steps and should show that upgrade is non-disruptive
    030613_2025_NexusUpgrad6.png
  7. Now check spanning-tree impact. Everything should pass
    show spanning-tree issu-impact
    030613_2025_NexusUpgrad7.png
  8. Check lacp impact
    show lacp issue-impact
    030613_2025_NexusUpgrad8.png
  9. There is also show fex to verify that all fabric extenders are reachable but in the Vblock there are no extenders connected to the switches so this can be skipped.
  10. Once steps 1 – 9 are completed and all are OK you can proceed to upgrade.
  11. Because this is Vblock and 2 switches are in vPC config you need to identify the primary one as the upgrade should be started from primary
    show vpc role
    030613_2025_NexusUpgrad9.png
  12. Start upgrade
    install all kickstart kickstart.bin system system.bin        <=== replace kickstart.bin and system.bin with your Kickstart and System file names.
    030613_2025_NexusUpgrad10.png
  13. Once prompted verify to continue by pressing y
    030613_2025_NexusUpgrad11.png
  14. The upgrade will begin.
    If you connected to switch remotely over SSH, you will lose connectivity after seeing Saving supervisor runtime state
    message as the switch is rebooting. This should take about 5 minutes. Ping it to find out when it is back online.
    030613_2025_NexusUpgrad12.png
  15. Login to the switch and check upgrade status. If upgrade went ok you should see that it was successful.
    show install all status
    030613_2025_NexusUpgrad13.png
  16. Verify version
    show version
    030613_2025_NexusUpgrad14.png
  17. Verify that everything is working as expected.
    Upgrade is complete
  18. In Vblock once you’ve verified that primary switch is working fine, upgrade the secondary switch.

UCS: Blade is stuck on discovery after UCS firmware upgrade (unidentified FRU)


12 Nov

Here is pretty common problem in UCS 2.0 release.
At any stage of UCS upgrade  one or more blades go into discovery mode and never finishes it. Depending on the version they can get stuck at any percentage but usually between 4% and 40%.
Most of the time a corruption occurs in SEEPROM of  M81kr CNA card because of this corruption checksum fails and UCS cannot recognize the mezzanine card any longer and this prevent Discovery from finishing.
You can see the following errors when this happens:
Configuration Error: adaptor-inoperable. Discovery State: Insufficiently Equipped.
Adapter 1 in server 1/1 has unidentified FRU 

There are multiple Cisco bugs for this issue CSCub16754, CSCty34034, CSCub48862, CSCub99354 and I’ve seen it happening on 2.0(1q), 2.0(2r), 2.0(3a) releases.
Unfortunately the issue is not fixed and there is no workaround. The good thing is that if this occurs the fix is pretty simple and quick and no hardware replacement is needed but only Cisco TAC can fix this or whoever has access to their internal resources.

To verify if corruption occurred you can do the following:

  1. SSH to UCSM IP
  2. Enter connect cimc x/y (Chassis/Blade)
  3. Enter mezz1fru on the versions starting from 2.0(3a) you need to enter fru
    If corruption has occurred the last line of the output will show something like
    ‘Checksum Failed For: Board Area!’

The other method to check is to look at the logs. (more…)

IT Blog

Just another blog on Kozeniauskas.com Network